So I got curious. That’s on me.

The problem with the Heltec ESP32 LoRa v3 development boards is that they come with WiFi, BLE, an OLED screen built in, and an already wired up space for a hobby battery. And to exacerbate that, they’re about $20 each right now in the USA. So if you happened to get the itch to experiment with Meshtastic it’s not really a huge outlay of cash and the time it takes to get a node up and running is pretty minimal. Once you figure out how to do it.
Why?
There’s no good answer. Like many things in Ham Radio, you can try to make a case that anything that doesn’t involve the internet would be good in an emergency. A self-sustaining mesh network of nodes that can fit in your pocket or ride on your backpack makes a great story. I’m a couple of weeks in on this and I’m not sold. I think if you had a small group of people and enough gear to support it, then yeah, these might be useful. But the real reason to tinker with these things is, well, the tinkering part. So let’s be honest about that from the jump, shall we?
I picked up three of these things in total just to mess around with and see what they could do. Curiosity is a good enough reason.
The Gear
OK. I’ve already called out the Heltec v3 units. I also grabbed some 3000mAh 3.7v lithium batteries. The ones I got have a neat little plug that magically fits the dev board so no soldering or crimping or nonsense there at all. Nice! Then I picked up a couple of cheap antennas. They do perform better than the little stubs that come with the boards themselves. Again, very inexpensive.
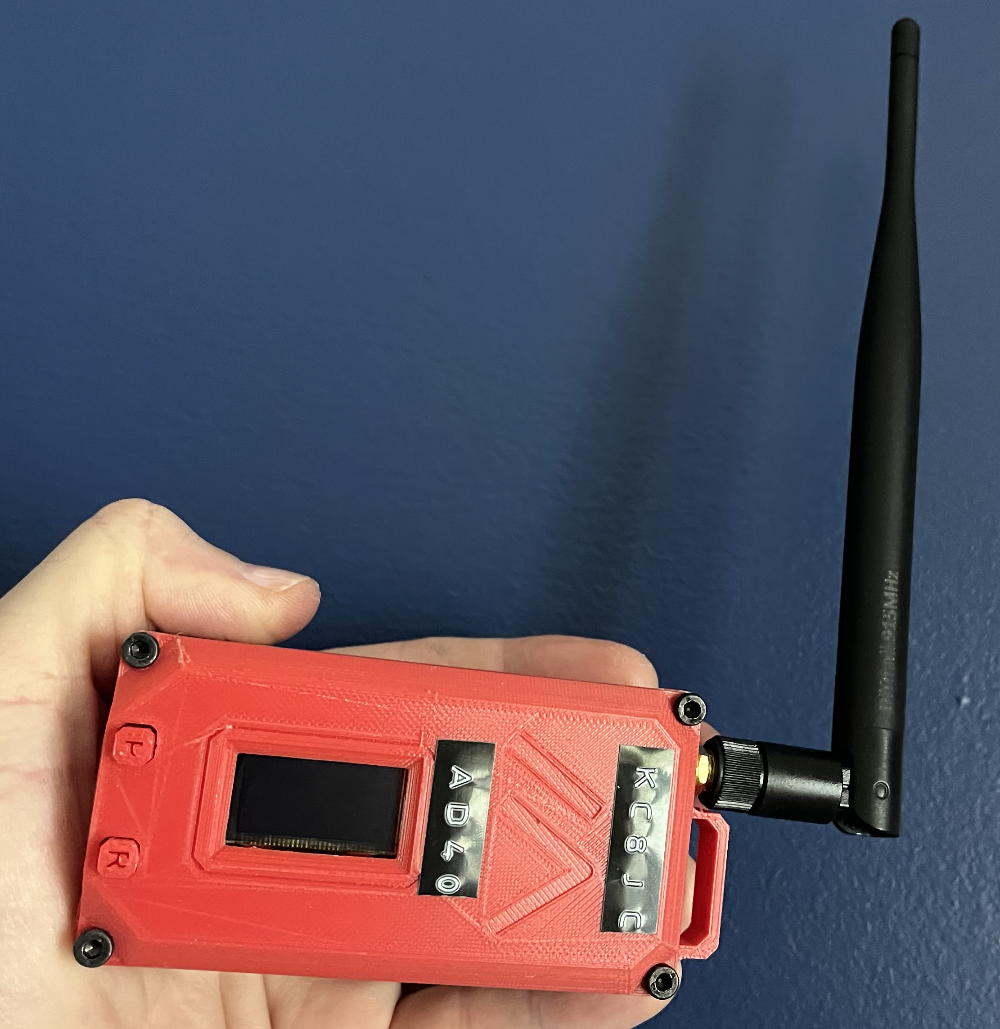
With the guts more or less assembled, we must as good Amateur Operators come up with a reason to fire up the 3d Printer. That was easy enough! The enclosure that I settled on was this little guy: https://www.printables.com/model/1515974-meshtastic-heltec-v3-case. Sure is pretty! I made two of them in red because I had a lot of red PLA lying around.
Also, I made the bottom piece of the model deeper because I knew it was going to be tight in there with the battery and anything else I might want to solder on.
I also picked up a couple of GT-U7 GPS modules and a couple of BME280 environmental sensors. I have a lot to say about those that will probably betray my inexperience with such things. I’m an amateur. It’s all a part of the blog. I’m not going to be embarassed of that. But I will have a lot to say.
The Software
The good news is, you can plug the ESP32 into your computer, launch Chrome (GAG) and navigate to https://flasher.meshtastic.org/ which is a really great web application. It will find the device and flash it with whatever firmware you choose. I went with the Alpha stuff because I like to live on the edge (and if I didn’t like it re-flashing it is low effort). For what it’s worth, I haven’t found any reason to change just yet.
With that flashed, you can download the Meshtastic app to your iOS or Android device or to your computer and pair the device using Bluetooth or USB right out of the box.
In my opinion the configuration of the apps themselves is a bit…um…underdocumented? There are a lot of forced options in the UI and things have strange intevals that don’t lend themselves to testing. That’s all well and good because it drove me to the command line and my latest Don Quixote Python Monstrosity. The apps are fine. They keep things simple but they lack granularity and configurability in some places and give too many opportunities to screw things up in others. It’s a strangely typical “Softare By Engineers For Engineers But Pretending To Be For Regular People” kind of feeling. I’m not sure who the Meshtastic target audience is honestly, but I will likely write up some suggestions for the developers to help address the needs of people who troubleshoot these things and people who are just looking for field communications around camp.
In any case, all you really have to do is set a region. Everything else could stay as it is.
With the device paired to your app you get to start the most important part of the Meshtastic experience: Waiting.
Lots Of Waiting
If you are a person who needs instant gratification, Meshtastic is not for you. The units need to sit and cycle a few times to see what’s going on in the neighborhood. I was under the impression that there wasn’t much going on in my area, but I found node after node popping up as I went through my day occasionally checking in on the status of things. There were hops all the way out to New York state from my location. That’s pretty impressive for 5 hops! I will readily admit I have no idea what kind of infrastructure is out there, but that was pretty cool.
I hesitated to put out a message. The thing is, there are open channels that anyone can message that will be pushed to all nodes. Cool! But it was really, really quiet. I thought about it a bit and then likened it to the silent repeater. There are probably a ton of people listening and no one talking. So I put out a message to see if anyone could hear me. They could! That was super exciting! But the chatter quickly died down.
I watched as the map spread. More nodes. More position data. More telemetry. Weather data. Little bits and pieces finding their way to me over the air. There were even some nodes that appeared to be very close to me as reported by their position data. Certainly some folks near the local University and maybe even a couple of radio operators down the way who have callsigns in their node names. I’m also guessing that there were quite a few mobile nodes just blowing through. It was fun to watch!
But as with all things ham radio, that’s not good enough.
Where Are We? GPS Time!
Since it is far too easy to put one of these little guys into a case, attach it to a battery, and call it done I decided to complicate things. I started with the GT-U7 GPS module. This GPS module is the one that is referenced most frequently in the Meshtastic documentation. It’s a solid performer and isn’t much to wire up. Two pins for data and two pins for power. No biggie. Well, I’ll admit to a couple of oopsies in the spirit of helping everyone else out.
First, on the unit where I was later to add an environmental sensor, I noticed that using a particular pin put me really close to the ribbon for the OLED. OK. Fine. Use any other pin, right? Well, any pin other than the reserved ones that I didn’t look up. Let’s say, oh, pin 21 which is the reset for the display. When you wire up an incoming data line to the reset of the display, well, the display goes away. I moved it to pin 20 and life was good.
Wisdom: The big thing to remember here is that the GPS pins you choose need to be configured in the app. This means that if you delete the app from your phone in an attempt to reset a few things the hard way, you will lose those pin settings and it might come to pass that you forget to set the pins and you wind up tearing down the unit only to discover that it was a configuration issue and not hardware. That’s something that could happen. If you’re not careful.
Sigh.
With all of the pins assigned correctly and the connections made on the hardware, positioning has been perfect. The units won’t grab position in my home office which is a faraday cage of sorts anyway but they work fine in the open spaces of the world. I can sit and watch the position data roll in from the node I have permanently attached to my desktop. More on that later.
Time…That Was Weird
When I first got the GPS units attached there was a very strange behavior. The time on the units was off. Not by hours - that would have been easy to diagnose and fix - but by 21 minutes. Or 17 minutes. Or 47 minutes. It was all over the place. However, if I disabled GPS in the configuration, the time defaulted to the attached device and everything was fine. This was a bit frustrating as reporting the correct time on the node display seems like a table stakes feature. And, yes, I made sure that it had acquired sattelites and was reporting a correct position.
So I employed my new Meshtastic Problem Solving Technique™: I ignored it for a few hours and, that’s right, it magically fixed itself. No change to config. No change to hardware. No change to number of sattelites acquired.
I am absolutely certain that there is someone out there that can explain this. It hasn’t been a problem in quite some time, so while I’d love to close the circuit, I’m past the point where it’s important.
The Environment
I installed a BME280 into one of the nodes. It does temperature (sorta), pressure, and humidity. I’ve learned, thanks to some smart kids on Mastodon, that the temperature sensor isn’t very accurate and really only exists to serve the pressure and humidity sensors which are. I can live with that.
I have a feeling that the sensor I installed into the node was faulty. It reported telemetry for some time and then started to fail. The temperature was off by 7dF rather than 0.5dC and it’s, well, flaky. I got it in a two-pack so I will think about what I want to do about it. I will probably end up making a node that sits outside and gathers that data. If I do that, I will print up a different case and make accomodations for that sensor so that it can be successful. Jamming it into a little box with the other components seems to be ill-advised.
An interesting note is that if a node picks up the environmental data from another node, it will display it on the local OLED. I find that useful and neat!
Wisdom: Read the product description. Get the 3.3v one and not the 5v because, well, if you’re running things on a 3.7v battery…yeah…you get it.
A Detail Or Two
There is an option in the software to configure a node for licensed users. Ya know, hams. It allows you to go up to a watt of power, but it skips encryption. I’m not sure encryption is in my use case right now, but most of the nodes in my area aren’t being used by licensed personnel as far as I can tell. So I left mine in the standard configuration. I have a license. I don’t have to use it. If I find a reason to switch things up, I will post about it.
Another thing to pay attention to is that if you want to re-pair the device via Bluetooth, you need to go into your device’s Bluetooth listing and forget the device. That’s the only way to force it to re-pair even if you delete and reinstall the app. That feels weird to me and I don’t like it, but it makes sense. Just remember that so you don’t get confused like I did.
Now What?
I plan to take a couple of the nodes camping and see what they bring to the table. If I can clip one to a backpack and send messages to and from camp, I think that’d be pretty neat. It would at least prove to me that I could have a canned messaging system for non-licensed users. That might come in very handy (until my nagging works and at least one of my kids gets a license). I’m also going to get a node going at my dad’s place just to ping back and forth because we’re nerds and stuff like that is fun.
These are early days for me with Meshtastic. I haven’t even looked at MeshCore yet (though you know I will on some rainy, boring day). I’m intrigued by the possibilities and I’m certainly interested in seeing what I can do with sensor data and other Fun Stuff.
I also realize that I need to put together some more info on how the configuration of the apps goes for my own reference, but right now I don’t feel like my setup is tried and true so I’m going to make that a future post.
Another thing on my TODO list is to pull together a guide for myself (and you if you’re still reading) of what the modules can show on the local screen and what options are actually useful in the field. That will come after a couple of camping and cycling trips I’m sure.
But maybe that’s it. Maybe that’s all Meshtastic brings to the table for me. That’s fine!
OK. But Seriously?
Yeah. I already let the cat out of the bag at the beginning. When I was testing position data, I wanted a node that pushed data out more frequently than what the app allowed in its forced choices. I also wanted to do better than pushing the output of the command line to a text file. I dug around and there is a command line tool for working with nodes and…oh…oh no…no that…YES!…a very robust Python library. This doesn’t bode well.
Or does it?
Folks who have read this blog in the past probably know about KC8JCLogger - The Logger No One Asked For. It’s my little foray into retro-looking TUI applications that remind me of PROCOMM from back in the DOS days. Well, I got kinda good with Textual and I really like the way it looks. And there is so much weird data that you can query from these nodes that it seems like a no brainer to whip up a TUI app for looking at things that are happening on the mesh. I can run it in a split terminal setup with my logger in another pane and my QMX+ GPS data in a third while I write blog posts in micro!

So yeah. That’ll be in another post that’s coming soon because I really couldn’t help myself.
Thanks for reading this far and there will be more soon!
73!