Brought To You By…
This post is about building a QRP Labs QMX+ transceiver. No, Hans G0UPL didn't sponsor this. Someone else made it possible. That someone else is Brandon Sanderson aka BrandoSando aka B-Money. He released a book about a week ago and at that point I became a Stormlight Archive Widow™. My beautiful wife has been sequestered with her eReader and occasionally shouting things like "Oh no! Not Gombleforper!!! What will happen to the Prophecies!!!" I'm not a fantasy guy, so I have no idea what she's talking about but it makes her happy so I'm happy. Happy enough to sneak off to my shack and pull out a box from a drawer because frankly I could dress like that athlete from Tonga and juggle flaming swords in the living room and she wouldn't notice. Might as well save the pyrotechnics for another day and do something fun, right?
Kit Building Is A Reminder
I've been building electronics kits for a very, very long time. My dad and I built them when I was too young to hold a soldering iron. As I got older, I got breadboard computers and other fun projects to assemble. To this day there is regret for losing track of the power supply I built in High School. For a long time, I built synthesizer modules from kits or raw components. I made at least half a dozen Theremins and other capacitance based sensor instruments. It was a great time in my life to experiment because I had access to Acme Electronics (seriously!) in Minneapolis. I loved wandering that place and picking through the bins.
As a man of a certain age with kids, however, kit building time hasn't been available much. I did build the Hardrock-50 amplifier for myself when I got my Amateur Extra license. But since then, it's been a few things like my QRP SWR/Power meter and a failed regular QMX.
That QMX was a thing. There are a TON of features in a VERY compact form factor. I greatly admire the engineering goals and the inventiveness at play in that radio, but I have to criticize the kit for being incredibly difficult to assemble. From my perspective, most of the difficulty is mechanical in nature. There are stacks of boards that are very carefully arranged to produce the final product. As many have noted, the power boards alone are a particular flavor of nightmare because there is NO tolerance for error and many opportunities to release the magic smoke. It wasn't a surprise to me when I put power to it and nothing happened. I still have it on my bench and at some point I will tear it apart just to see where it went sideways, but that's not today. Today, I'm celebrating!
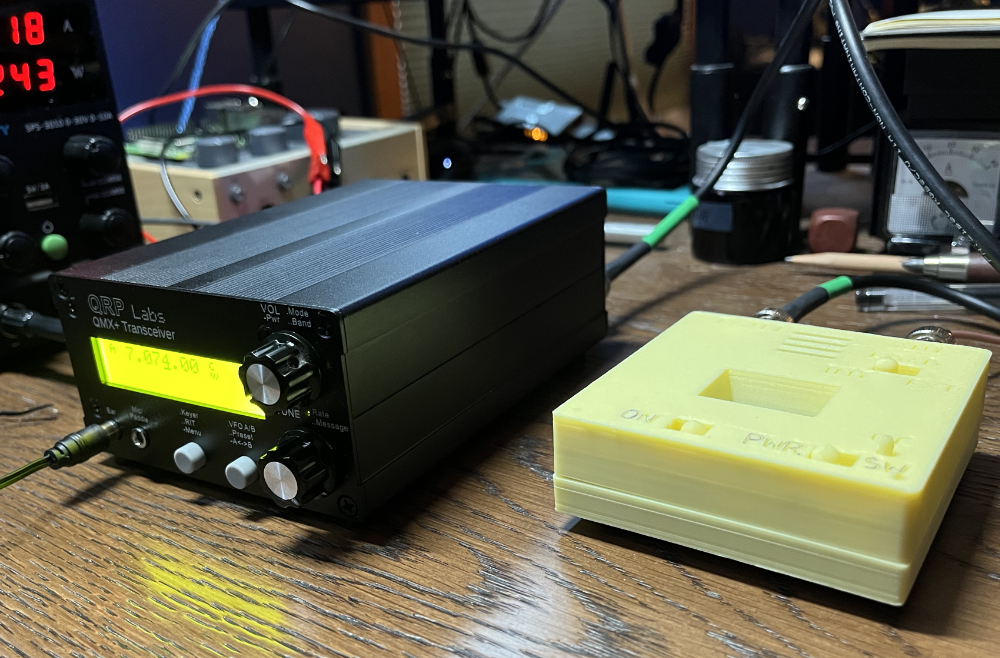
Enter The QMX+
When the QMX+ showed up on the scene, I got really excited. It's a full 160m to 6m CW and Digital rig and the layout is so much simpler for a kit builder with a much larger case compared to the QMX. It was easy to see that the assembly was going to be friendlier to a wider audience of builders. The other thing that demanded attention was the amount of space in the case and the availability of a development board. The potential for adding things like an ATU-10 kit or batteries immediately jumped to mind. I wasn't alone in noticing that.
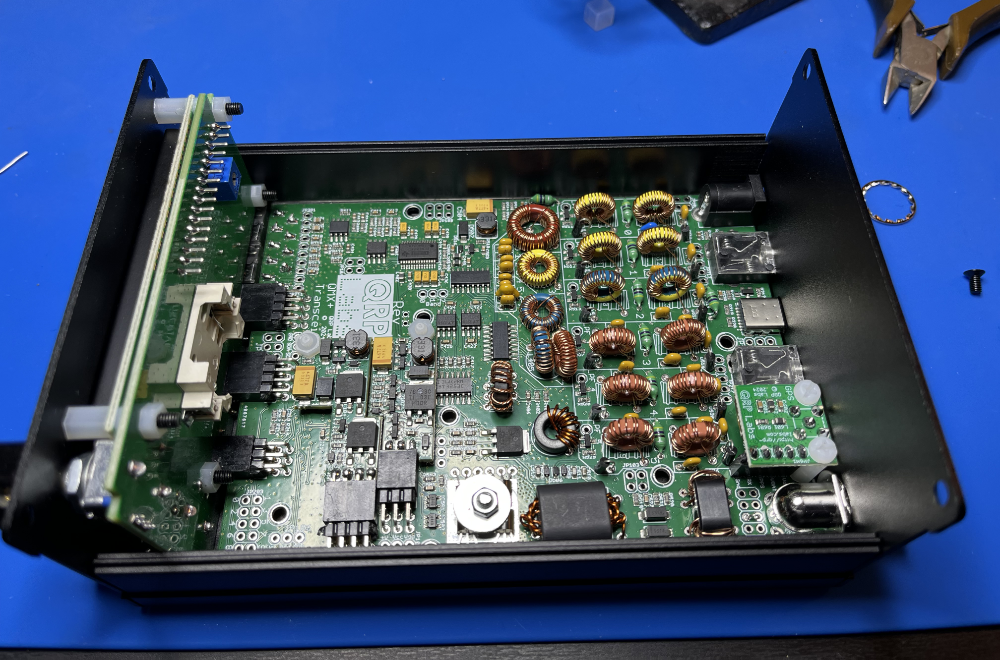
The build itself wasn't at all painful. Lots of winding of toroids and only two or three that required extra steps or a little more attention. It actually went together pretty quickly. The only place where I spent extra time was the bump out where the headphone and key jacks attach to the main board. There was some construction using lead trimmings to connect the two and that takes some dexterity and planning when you have giant hands and need to use a hemostat to maneuver. It was the only notable challenge in the construction.
The biggest - and really only - choice is made at the start of the build: 12 volts or 9 volts? I built mine for 12 volts knowing full well that building for 9 was just going to bring me heartache. Running the 12 volt version at 9 volts is possible. But having anything over 12 volts even look at this thing would be dangerous. Hans G0UPL is very clear about this. A 13.8v shack supply is going to fry this thing like an egg. There are plenty of horror stories out there and no one wants to be a part of them. So it seemed like the safest play was to go with 12.
In addition to the QMX+ dev board, I decided to grab the QLG3 GPS unit. There is always a good use for a GPS clock and tying it in to the WSPR beacon function sounded fun. Setting up a beacon while camping is the kind of nonsense I need in my life. Adding the GPS to the QMX+ is trivial and worth the extra 5 minutes.
And Now…Wait
I know better than to apply power as soon as I'm "done" with something. I also know far better than to put the case together. So I sat on it for a bit. Inspected my work. Looked for bad or weak joints and generally enjoyed that period of time between the last component going on and knowing that I've screwed up.
I would laugh about this later.
Fire It Up!
After some time and with fresh eyes, I did apply power and it sprang to life. With it attached to my Mac, the Finder discovered it as though it were a flash drive - as designed and expected. The firmware loaded up with no issues.
I was able to move through the menu system on the rig and set things to my liking. All of the buttons seemed to work and the knobs too. With it attached to the DX Commander in the yard, reception was fantastic. Really good. CW stations booming in and FT8 beeps and boops of the appropriate types. All good news!
WSJT-X
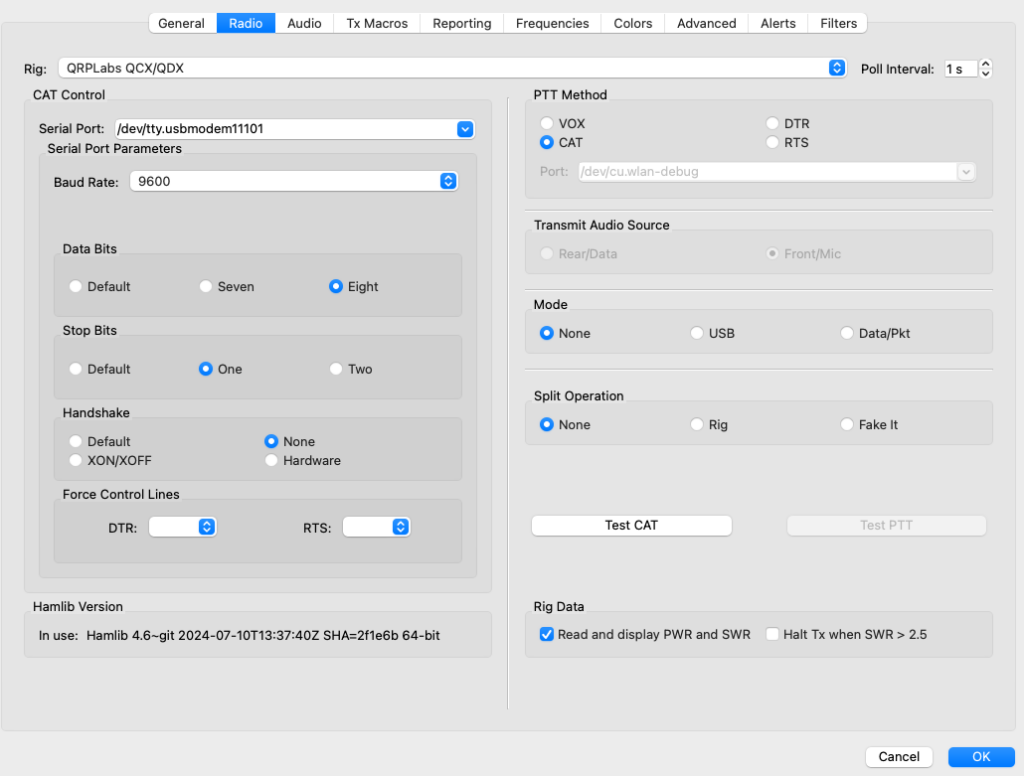
The manual is very detailed and points a user in the right direction for getting WSJT-X configured for success. On the Mac, there are some pleasant surprises and a thing to watch out for.
In the manual, it says to select the Kenwood TS-440 as the rig for CAT control. In my version of Hamlib, the TS-440S is available and it fails the CAT test. Unexpectedly, there is a "QRPLabs QCX/QDX" entry that does work. That's the right thing to pick for the configuration.
(And yes, this DID lead to an eventual Side Quest!)
The other really pleasant surprise is that the QMX comes up as an audio device on Mac OS X. Instead of "USB Audio Codec" or some cryptic Linux ALSA naming convention, it shows up as "QMX Transceiver" in the audio selection dropdowns.

I smiled when I saw that. That's just cool!
With all of the settings set, it was time to see how it was looking on PSK Reporter. After a few cycles on 40-meters the situation was grim. The QRP Guys SWR/Power meter was quickly deployed and showed beyond a shadow of a doubt that no RF was leaving the QMX+.
Depression Sets In
Not really. This is the part of the story where it goes from a well-planned trip to an adventure. With my dad on the line, we started poking and prodding. Everything seemed fine. There was power where there should be power and all seemed well and right with the world. We started thinking about software issues. It was decided that the rig would go to his place the next day because he has all kinds of cool test equipment.
But who leaves it at that? No one, that's who.
With some time on my hands - thanks again, B-Money! - I went over the bottom of the board looking for bad or missing solder joints. I started from the RF out and THERE IT WAS. The T507 toroid had one bad connection. I touched it up and plugged a key in. BOOM! There was RF flowing into the dummy load and power was measuring where it should.
Mac Party Tricks
With things seemingly in good working order, I decided to poke at the test capabilities. The rig has the ability to receive a connection over a serial terminal line and run a few different diagnostics. There's no mention of the Mac in the user manual so I will give a hand here. The magic is simply to know the device handle of the QMX+ - in my case it is /dev/tty.usbmodem11101 - and then connect to it with a cute little command called cu.
sudo cu -l /dev/tty.usbmodem11101
I'm showing this using sudo because I don't know if you're in the wheel group on your system. sudo means never having to say you're sorry, so it will give you sufficient privileges to make this connection and it's probably not going to blow up anything.
After issuing that from the command line, a simple text driven menu shows up. I mention this because I'm sure there are other Mac using QMX+ operators out there and this is going to be a moment of frustration if cu is not something you've used before or even heard of because why would you know anything about serial terminals in 2024?
Because Ham Radio, that's why.
Diagnostics
Within the diagnostic tools there is the capability to check the current functioning of many critical parts of the QMX+. The power board statistics are there, current voltage supply measurement, and the ability to key up the rig and watch the power flow. It also has tests for buttons, knobs, and key/paddle inputs. It's really, really useful.
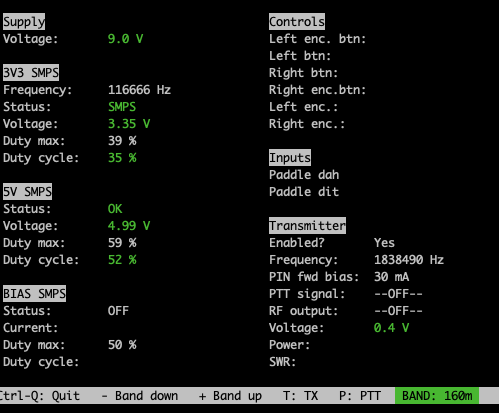
The terminal connection also gives access to the band configuration settings that allow for some serious tweaking. This might be a place to spend some time setting the audio gain so that WSJT-X will have a good input range while receiving. I did a little tweaking there, but I imagine that will be a very personal experience based on different computers, etc. Worth noting is the facility for messing with frequency settings and enabling or disabling given bands. There is some extremely fiddly stuff in here. I'm not touching it until I have a much better understanding of "All The Things And Stuff."

WSJT-X Success!
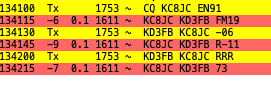
With RF indeed flowing out of the back and into the antenna, it was time to get a contact. On 40-meters it took all of about 3 cycles of calling CQ to get a reply. The QMX+ was sending out 1.47 watts according to the meter. KD3FB in Maryland came back with a signal report of -11. Not surprising at all. Quite a welcome response! A few minutes later, there was a contact on 20-meters with K0GMK in Minnesota. This is, indeed, what success looks like.
WSPR: A New Frontier (for me)
Weak Signal Propagation Reporter (WSPR) aka "Whisper" is another brilliant creation from the mind of Joe Taylor, K1JT. It's a method for sending low power signals with foreward error correction that can help map propagation. From my perspective as a ham, I have always thought of it as setting up a neat whirlygig in the yard to look at from time to time on a nice day. In a sense, it's the radio equivalent of that because it, well, sort of tells you the way the ionosphere is blowing. I suppose it's also something to do when a station is idle that can contribute to our overall understanding of propagation which is a pretty noble goal. But I'm sticking with the ham radio whilygig comparison and I'm doing it because it's new to me and seems cool.
The QMX+ comes with a WSPR beacon built-in. This is a place where QRP Labs has been working for quite a while. They have had several WSPR beacons in the store over the years. It's really neat that Hans decided to include this in the QMX+. Truthfully, I don't know that I would have ever tried WSPR on my own without it being baked into this rig.
Setting up the beacon is simple. The only gotcha is that the callsign has to be 6 characters in length and that the third character has to be a number. In his example, Hans G0UPL puts a space in as his first character. Someone like me who has a 2x2 needs that space at the end. The beacon does an error check at the point of data entry before it sends or schedules the first transmission. That's how I figured out the position of the number in the call was so critical. Go error checking!
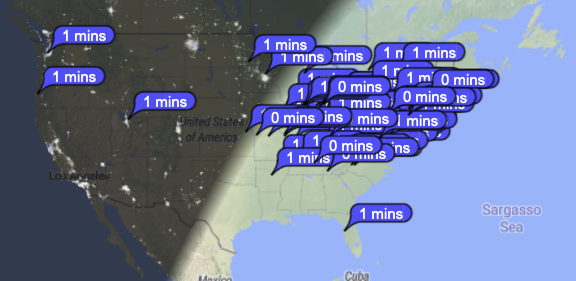
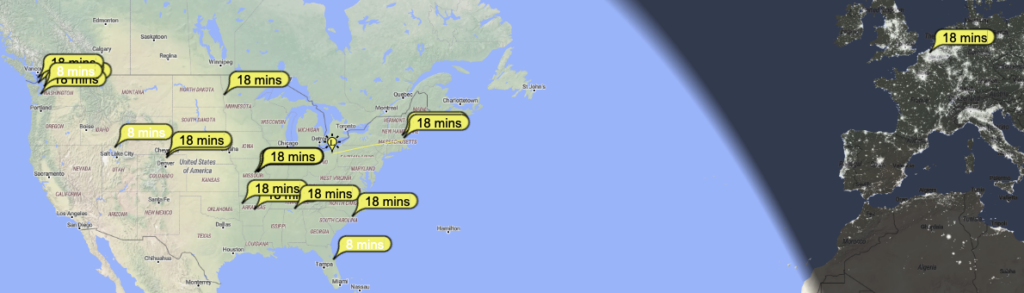
I was pretty surprised to see myself being picked up as broadly as I was on 17-meters. Why 17? On this particular day, it seemed to have the fewest beacons reporting on PSK Reporter. I can see myself letting this run sometimes just for the fun of it! And it will definitely be a thing I set up when we go camping. It's neat!
What About CW?
When I first turned on it on, I set the CW Decoder to run to see how it did. I've had a lot of disapointment with CW decoders. The QMX+ copied my code really well and even did a pretty good job of copying the code that I was tuning in on the air as I wandered up and down the bands and tried in vain to get the Reverse Beacon Network (RBN) to pick me up (no RF coming from the rig is a bummer like that). The sidetone is easy to set and the keyer speed is one button touch away - an ENORMOUS interface win for Hans here! As of this writing, I do NOT have a CW QSO in the log. I've been hunting, but I'm getting stepped on in most places, though the RBN is indeed picking me up now. My plan is to hunt some more but this rig will go to the park with me soon enough. I will definitely report back on CW performance which I expect will be stellar.
Side Quest!
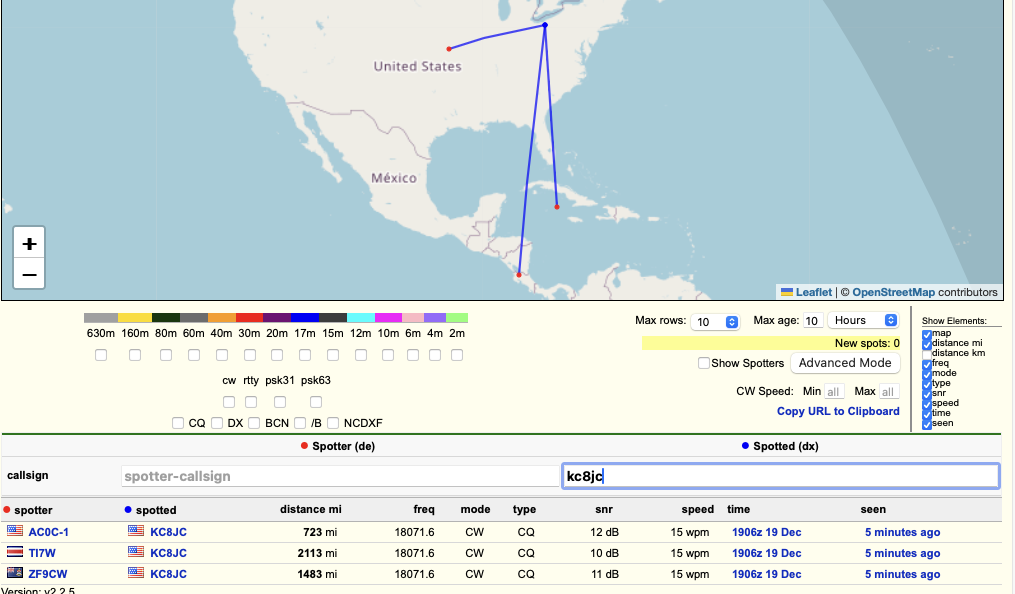
Didn't think I'd let this drop, did you? The unlikely discovery of the QCX/QDX in WSJT-X led me to run rigctl -l | grep QRPLabs and it returned a hamlib device code of 2052. Naturally, I fired up rigctld pointed at the appropriate device with the appropriate rig ID and it did exactly as I'd hoped. I was able to send TEST DE KC8JC on CW using rigctl. The QMX+ is absolutely capable of being controlled by my bestest ham radio software buddy: rigctl. How cool is that? Very. Very cool.
Final
So far, this rig is a blast! Sure, I'm still in that early honeymoon phase with it and basking in the glory of a seemingly successful kit build, but I feel like the capabilities that I've unearthed in the past couple of days are absolutely worth the price of admission. The build was fun and what this thing can do in this little box is impressive. Being able to run FT8 and the associated modes, a built-in WSPR beacon, GPS capability, and the promise of software updates that will bring along SSB (for even more digital mode fun) make this a a dream QRP rig. I'm really looking forward to getting it on the air and making a pile of CW contacts. It will most certainly go with me on my next (hopefully soon) activation.
I know already that I will chase down the mods people are doing including this project to build in a combined ATU-10, internal battery, and speaker board. I'll be on the lookout for 4 other QMX+ owners to go in on the PCBs with me. I can't imagine how awesome this little unit would be with all of those things crammed in there. Yeah, I'm excited!
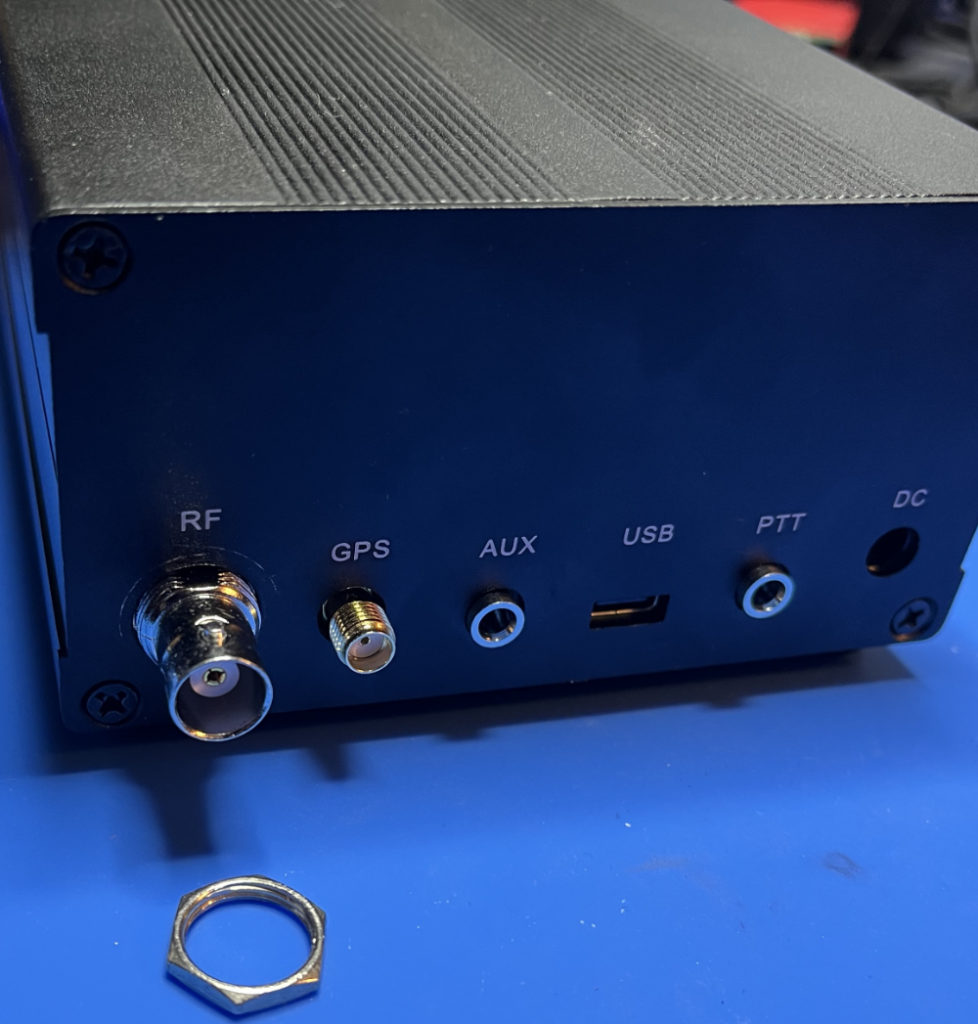
Oh, and for good luck, I left off the nut that goes around the BNC connector. It's the biggest pain to remove so if I leave it off, I won't have to open the case again, right?
Thanks for reading and 72!